This a guest post from Heather Challenger of the Cake Decorating Store in the UK.

With the birth of the Royal baby, what could be cuter than these little royal cupcakes for your own little Prince? They are really easy to make and you only need a few basic items of equipment. You can of course modify these to make little Princess Cupcakes if you wish. Simply make the bonnet out of a pink sugar fondant (sugarpaste) and use a silver crown or tiara.
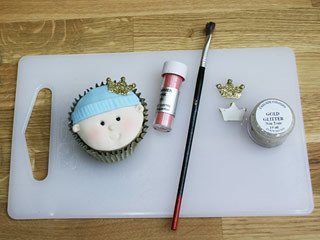
Here’s what you need: flesh/skin, blue coloured sugarpaste, white florist paste, edible glue, black piping gel, round cutter, cocktail stick, tapered cone tool, flower/leaf tool, scallop & comb tool, pink blossom dust, gold glitter, small paintbrush, rolling pin.
Here’s how to make them. Bake your cupcakes in a gold cupcake case. You can make whatever flavour you like of course. You want to try and get a nice domed shape on top to give a nice rounded face, so make sure you fill them ¾ full with batter.
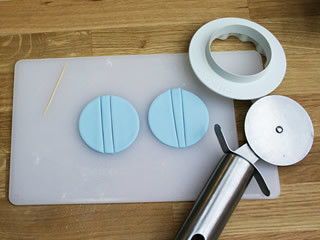
Take the smaller semi-circle and attach to the top of the cupcake with a little edible glue (or cooled boiled water). This forms the top of bonnet / hat. To make the rim, use a cocktail stick and indent lines along the length. Attach this to the base of the semi-circle. Trim off any excess.
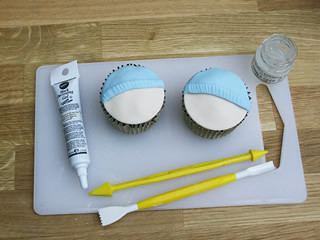
To make the face, take the cone tool and press into the cupcake – 2 holes for the eyes and one for the nose. Taking a tiny amount of flesh sugarpaste, roll a small ball and attach into the nose hole with a little glue. For the eyes, use a little blob of black gel to make the pupils. You can also use an edible pen, but I find the gel gives a lovely sheen and a more realistic eye!
For the mouth simply insert the curved end of the Scallop/Comb Tool into the sugarpaste. You could also use the end of a drinking straw if you don’t have one of these tools.
Lastly, make two indents with the taper cone tool at the side of the head where the ears will go. Using a tiny amount of flesh coloured sugarpaste roll into a ball then a cone shape. Secure the narrow end into the indent, using a little glue. Finally using the flower/leaf shaper tool, press the circle to make a little circle.
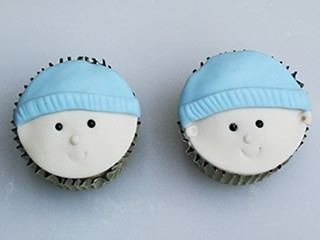
With the birth of the Royal baby, what could be cuter than these little royal cupcakes for your own little Prince? They are really easy to make and you only need a few basic items of equipment. You can of course modify these to make little Princess Cupcakes if you wish. Simply make the bonnet out of a pink sugar fondant (sugarpaste) and use a silver crown or tiara.
Here’s what you need: flesh/skin, blue coloured sugarpaste, white florist paste, edible glue, black piping gel, round cutter, cocktail stick, tapered cone tool, flower/leaf tool, scallop & comb tool, pink blossom dust, gold glitter, small paintbrush, rolling pin.
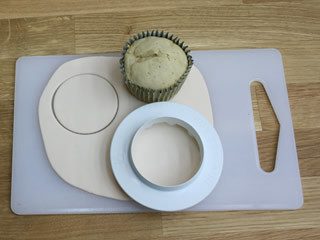
Here’s how to make them. Bake your cupcakes in a gold cupcake case. You can make whatever flavour you like of course. You want to try and get a nice domed shape on top to give a nice rounded face, so make sure you fill them ¾ full with batter.
Next make the bonnet by rolling out the
blue Sugarpaste and using the same round cutter cut out a circle. With the
pizza wheel (or a sharp knife) cut the circle about 1/3 of the way down and
then cut a thin strip below that which will form the rim of the bonnet.
Lastly, make two indents with the taper cone tool at the side of the head where the ears will go. Using a tiny amount of flesh coloured sugarpaste roll into a ball then a cone shape. Secure the narrow end into the indent, using a little glue. Finally using the flower/leaf shaper tool, press the circle to make a little circle.
The final details are to dust a little pink blossom dust on the cheeks and to add the sparkly crown. To make the crown I made a template from card and cut out the crown using white florist paste and attached 3 tiny balls with glue. Ideally make these the night before so they can dry. To decorate the crown, I brushed it with edible glue and dusted generously with a gold glitter. Be warned though – the glitter gets everywhere so maybe do this some place different unless you want to end up looking like a glam rocker! Attach the crown with glue.
Comments